Table of Contents
Core Synergies
The best late game leader at the moment, largely thanks to FB07-121 allowing to remove anything in the game while still keeping 5 energies open to play more cards, FB07-049 has become a force to be reckoned with in FB07.
From a synergy standpoint, there isn't much of a difference with the likes of FB01-070. We are looking to safely ramp to eight energy, and stomp our opponent from there with power turns mixing high power cards, removal, and card draw to stay away from any potential lethal push.
In that sense, the deck is sometimes its own worst enemy, as failing to find our ramp cards in time is typically our worst match-up. Green gameplay at its finest.
Early on then, the deck will focus on drawing cards and gaining energy. The most important card in that phase is FB07-058, representing our transition to our comfort zone. Just like FB02-077 in the past, we need to make sure we have the appropriate cards in our drop. Then, we will target cards with cost of three or more when discarding with FB07-050 or FB01-079, while we can also use one as a combo if needed.
The ideal scenario is to play FB07-052 the turn prior to both ramp and get a 3-cost into our drop.
Once at eight energies, FB07-121 becomes our key card, and its ability to restore 5 energies back to active will dictate a lot of our deckbuilding decisions.
Currently, the common way to build the deck is to fill it with card advantage driven abilities. Indeed, since a lot of decks would rather target our leader rather than deal with a 50,000 power card, keeping a large hand will ensure the opponent can't simply come for the kill.
In that context, FB01-079 and FB02-098 are great follow-ups, cheap enough to allow up to play other low cost cards, such as FB07-053.
A turn with FB07-121 plus FB02-098 picking up two FB07-053 we can play immediately will turn a menacing board into a safe situation.
The other way to prevent our opponent from pushing for lethal is to use FB07-051 as a follow-up. Now at 25,000 power, our leader will be much harder to hit, while we also developed two sizeable battle cards, to prepare for our own assault in the near future.
FB07-066 is another one designed for that scenario, but the card tends to be cut from the deck due to holding no combo power.
Turning the pressure around is the other way to build around FB07-121. If you let your opponent hit you down to two health, FB05-119 is now a possibility, representing a 50,000 alongside a 45,000 double strike pair of attackers.
FB05-068 is a good inclusion in that strategy, allowing to restore two life to get out of the danger zone after we accepted some hits.
Last, there is another way to approach the late game, which is to take it even more slowly, and aim to play two FB07-121 in a turn. Doing so, we immediately set up a board able to end the match, or force our opponent into spending a lot of cards to defend those incoming 50,000 attacks.
To do so, we'll simply keep ramping when at eight energy, with another pair of FB07-052 and FB07-058.
Decklist
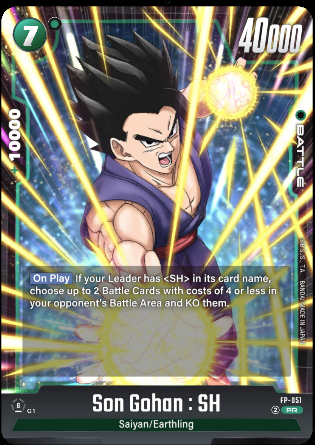
FB07-058 is a placeholder for the real 7-cost Son Gohan we want to play in this deck, but that one is missing from our deckbuilder at the moment.
Most players agree on 47 cards in the deck at the moment, with the remaining four being split amongst the options we listed to pair with FB07-121.
In this build, we have FB01-085 and FB06-120 in those slots. This deck is fine drawing on turn one and two, so 10 1-cost draw doesn't feel too much. As for FB06-120, the card is great for the mirror match, representing an answer against a turn with two FB07-121 played. Plus, it is a mix of all the things we might want to do in the late game with a card added to our health, a huge double striker on the board, and an AoE all in one card.
I don't believe there is an ideal way to build the deck. Rather, consider those last four spots as your room to edge against the match-up you expect to go against, or simply to make the deck your own, with cards you value particularly.
As time passed, most players have started to cut as many 0 combo cards as possible. Then, FB05-119 and FB07-066 aren't as popular as they used to be.
The same could go for extra cards, which only shine in the late game, once we managed to stabilize, and either need some extra power to deny our opponent's last assault or for our own push. With that said, FS03-15 and FB02-104 make sense to consider, while FB05-068 can be a great 1-off against aggressive opponents.
FB06-120 is taking those two slots, but plenty of cards can be tested instead.
Match-ups
When the dream curve happens, and we get to drop our first FB07-121 on turn five, there really aren't any bad match-ups for FB07-049.
Indeed, except if you were careless with your health and your opponent decided to go all-in while FB07-057 didn't show up, there is little the opponent can do. Otherwise, FB07-121 followed by FB07-051 or FB02-098 plus other cards to fill our hand with combo power should prevent most lethal scenarios.
Once we stabilized the board, the opponent is forced to go all-in eventually, as they can't let us stack on big battle cards forever. Then, our goal is to remove any possible lethal setup they could have. In that context, all our decisions should be geared towards growing our hand size and limiting theirs. This is typically a good line against an opponent able to push for lethal from afar, like 3 or 4 health. In those scenarios, we won't attack their leader with our big battle cards unless those hits represent a real risk for them.
In practice, this means we'll first start with 20,000 attacks, asking them to use a card or lose health while our bigger cards have not attacked yet. If they spend a few cards to defend those cheap shots, we're fine not attacking their leader any more. If they did lose health to get more cards, we'll make sure they have to use even more defending against 50,000 power attacks to stay alive.
The one exception to that rule are other green decks, able to go toe to toe with us in the late game as we trade 8-cost bombs back and forth.
Typically, we want to force their FB07-121 first, so we can use ours to remove it. At the end of that back and forth, we should have the last one standing, and win the value war. If you get to 8 energy first, you can ramp even further than 8 energy in order to play two FB07-121 at once.
More bombs are a good way to edge those match-ups, as it means we can play a big card first, but still be ahead in the value war, hence why this build runs two of FB06-120. FB06-055 is another interesting prospect, preventing our FB07-121 from being removed by the opposing one.
One more thing to keep in mind is the possibility to run out of cards in deck if you fall behind. Indeed, once the exchange of FB07-121 is complete and the final one is left, it can be very tricky to wrestle the board back in order to pressure your opponent. Unfortunately, if you don't find a way to do so, your opponent will hit you for 50,000 every turn and run you out of cards eventually. Either in hand as you have to defend those huge hits, or your deck as the game is stalled. In those situations, FB07-121 is a great way to get more combo without digging through our deck.
Against the other colours, the important part of playing FB07-049 lies in our ability to compete when that ideal scenario does not happen. Most of the time, the solution is to buy yourself as much time as possible, and find a way to get to FB07-121 without being so far on the board you can't swing it back.
With no ramp available, the likes of SB01-029, FB07-025 or SB01-001 will simply outpace us. However, one extra energy can be enough to reach six energy in time for FB07-053 to start stalling for time.
The 1-cost, paired with FB07-051 to increase our base power, or FB02-098 to stock on combo available, will represent all we want to do until we reach eight energy. With two energy to spare, FB01-079 is a great way to draw while distracting our opponent from our leader, at least for an attack.
Once at eight, FB07-121 can start cleaning the board, while FB06-120 closes the door the following turn. FB05-068 helps immensely in those games, as we are bound to flirt with death on several turns.
The key to holding the fort is to immediately go into turtle mode as we notice we don't have any ramp available. Then, combo your early cards to defend incoming hit, they will be removed by FB07-044 or SB01-004 anyway, while FB04-093 is going to discard us. Only accept attacks at 25,000 or higher, at least as long as 10,000 combo cards are available.
FB07-053 can be fetched from the drop, while the 7-cost Son Gohan : SH isn't in the deck for anything else but its SH tag and 10,000 combo power. The only 2 cards you can consider keeping instead of defending a hit are FB07-051 and FB02-098, if you are certain they will allow to tank more hits later on.


![Purchasing MANGA BOOSTER 01 [SB01]](https://dragonball.gg/wp-content/uploads/sites/36/2025/06/Shop_EN-768x447.png)